
The Queen Lion of Skeleton Coast
May 22, 2014Naankuse & Gobabis Toyota Join Forces
May 27, 2014Text by resident photographic talent Annabelle Venter
Namibia’s Green Season puts a smile on everyone’s face. It’s a great time for photography. Beautiful clouds present great backdrops, blue skies complement the green grasslands, carpets of yellow flowers seem slightly unreal, and there are still lots of birds around. You may even be lucky enough to witness a river in full spate or capture the lightning strikes of a late storm. It’s a photographer’s delight in Namibia!

Sossusvlei Clouds. Photo ©Paul van Schalkwyk.

Photo ©Paul van Schalkwyk
This is the fourth and final instalment of our photography series, and we’ll take a look at capturing the landscape in all its lush, green glory before it fades. We’re also going to discuss briefly how to process all the wonderful images you’ve captured over the four seasons, and how to get the best out of your holiday shots.
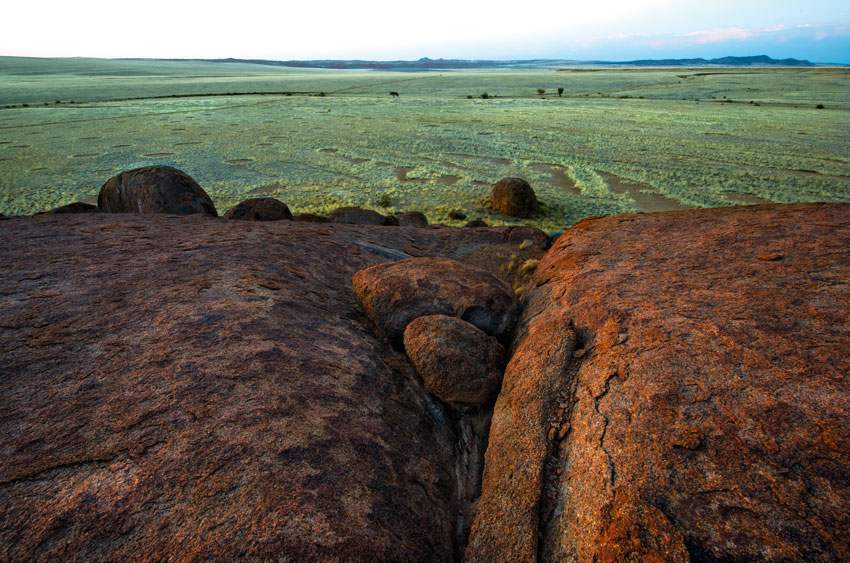
LANDSCAPES AND SHAPES
Beautiful landscapes are on every photographer’s wish list of images to take home. They help you remember the scenery and the mood long after your trip. While it’s tempting to jump out of the car and just snap the scene in front of you, it’s worth taking time to plan your shots to capture unusual angles that that will make your photos uniquely yours.

Yellow flowers. Photo ©Paul van Schalkwyk
LENSES – if you want to travel light, then you’ll probably do very well with just one zoom lens, as it will cover most situations. For this, I would suggest something in the range of 24–200mm. It’s good to have the variety for landscapes, for the following reasons:
- A wide focal length (17–24mm) enables you to include interesting subject matter in the close foreground within a vast scene. In one frame you can have buildings, people or animals in the foreground as well as plenty of detail in the distance.
- A 50mm lens gives you the closest image of what the eye actually sees.
- A telephoto lens (at least 200mm) cuts out distracting components on the sides. Longer than 200mm focal lengths compress the background, making it blurred. This can be very effective when photographing a subject on the edge of a mountain, for example.
- A hood for your lens will keep out unwanted sunlight and prevent sunspots on your image.
Green Vista.
- LIGHTING –As with most other types of photography, lighting is everything! Choose your shots the day before if possible and get going before dawn to catch those first rays of the sun. The golden hour softens the landscape and casts interesting shadows. Be prepared to walk/hike/climb to the best vantage point you can find for a different view to remember forever. The chances are you’ll remember the hike too!
- RAW – Shooting in RAW format allows you to do detailed processing later on and still maintain a high-quality image.
- DEPTH OF FIELD – A smaller aperture (such as f22) will give overall sharpness to the scene, but might slow your shutter speed and result in a less sharp image. You can compensate by increasing the ISO. However, most lenses seem to have a sweet spot where the focus is sharp, so you rarely get the whole image in sharp focus at maximum apertures.

Desertstorm. Photo ©Paul van Schalkwyk
- RULE OF THIRDS – This is an imperative when it comes to landscapes. If the clouds are spectacular, make two-thirds sky and one-third ground. If your foreground subject is on land, then reverse this rule. And don’t forget to keep your horizon straight! You can fix this in post-processing, but you will lose a bit of your image on either side.
- TRIPOD – This is my personal favourite! Using one improves any image, and it’s even better if you have a shutter-release cable, which is great for slowing movement, such as wind in the trees and waterfalls. A tripod also enables you to use a self-timer and be in the picture yourself!
- WEATHER – Don’t be put off by lack of sunshine or impressive thunderclouds. Overcast days can offer diffuse light and for some subjects this may be better than deep shadows.
- FILTERS – Polarising filters can be of great help to cut out water reflections or improve a dead sky. A graduated neutral-density filter helps to even out the strong contrast between bright skies and darker land, resulting in a more natural colour for both.

Footprints.
- VERTICAL – Try shooting a vertical frame for a different perspective. With a wide-angle lens make sure to get close to your subject in the foreground. This will provide a generous sense of distance in your image.
- WILDLIFE AND LANDSCAPES – Anyone can take an animal portrait. But capturing an animal in its environment requires more skill, lots of patience, and luck. You seldom see that leopard in a large tree, but will you be prepared when you do? You may only need a 50-mm or longer lens here, as your subject is almost certainly not going to be near you. Try to capture the scale of the animal in its environment and its role in that space. We’re going for mood here!
- TIME – This is an important component for creating the right mood for your image. Be relaxed!
THE FINAL STEPS – basic stuff

Photo ©Paul van Schalkwyk
With so much photography-editing software available today, you might well become confused as to which one to choose. Most cameras come with some editing software, or you could choose Photoshop Elements, Adobe CS6, Lightroom or Aperture (for Mac users). But be warned – there’s only so much you can do with a poor image before it starts looking ‘squeezed’.
- GET IT RIGHT IN CAMERA – This is your best bet for a good image and takes consistent practice. Research the various techniques before you leave home and write them in a notebook in your camera bag. Then go out and search for ‘the silhouette’ or ‘the macro flower’. Preparation plays a large role in a successful shot.
- BACK UP FILES BEFORE YOU START – I can’t say this often enough. Make two copies if you can, and save them on different hard drives away from your computer.
- SHOOT IN RAW – You have far more control over what you can do in Camera Raw than when trying to fix a jpeg.
- LESS IS MORE – While this is such a cliché, it is simply true. The less processing you do, the truer your finished image will look.

Photo ©Annabelle Venter
- GO EASY ON THE SATURATION BUTTON – Keep the colours natural – over-saturation is such a common mistake and makes the image look unnatural.
- DON’T OVER-SHARPEN – This is another frequent mistake, since it results in harsh, jarring images.
- REMEMBER THE TWO-THIRDS RULE – Crop the image if necessary to get this right. It’s almost never okay to have your horizon in the middle of the frame.
- FIX THE WHITE BALANCE – You can set this in your camera or correct those strange colour casts when you start processing. The camera doesn’t always judge the neutral tones correctly, but fortunately this is something you can correct.
- STRAIGHTEN HORIZONS – When you’re shooting really is your one and only chance to do this! A slanted horizon can spoil a beautiful image and is picked up instantly by other photographers!
YOU MIGHT ALSO LIKE
Summer Photography Tips for Namibia
Spring Photography Tips for Namibia
Winter Photography Tips for Namibia
This article originally appeared in the 2014 Autumn edition of the Travel News Namibia edition
